ABSTRACT:
A college campus recruitment system that consists of a student login and an admin login. The project is beneficial for college students and various companies visiting the campus for recruitment and even the college placement officer. The software system allows the students to create their profiles and upload all their details including their marks onto the system. The admin can check each student details and can remove faulty accounts. The software system allows students to view a list of companies who have posted for vacancy. The admin has overall rights over the system and can moderate and delete any details not pertaining to college placement rules. The system handles student as well as company data and efficiently displays all this data to respective sides. The management filters the student database based on the requirement of the companies. Students used to register for the recruitment drive and they give there details with marks. Based on the company requirement management filters the student data and gives the list to the company.
EXISTING SYSTEM:
This project helps the college management to manage data for the placement. There is no existing project for this to develop.
PROPOSED SYSTEM
This project collects data from each student by registering and helps to filter the student to attend placement based on company requirement.
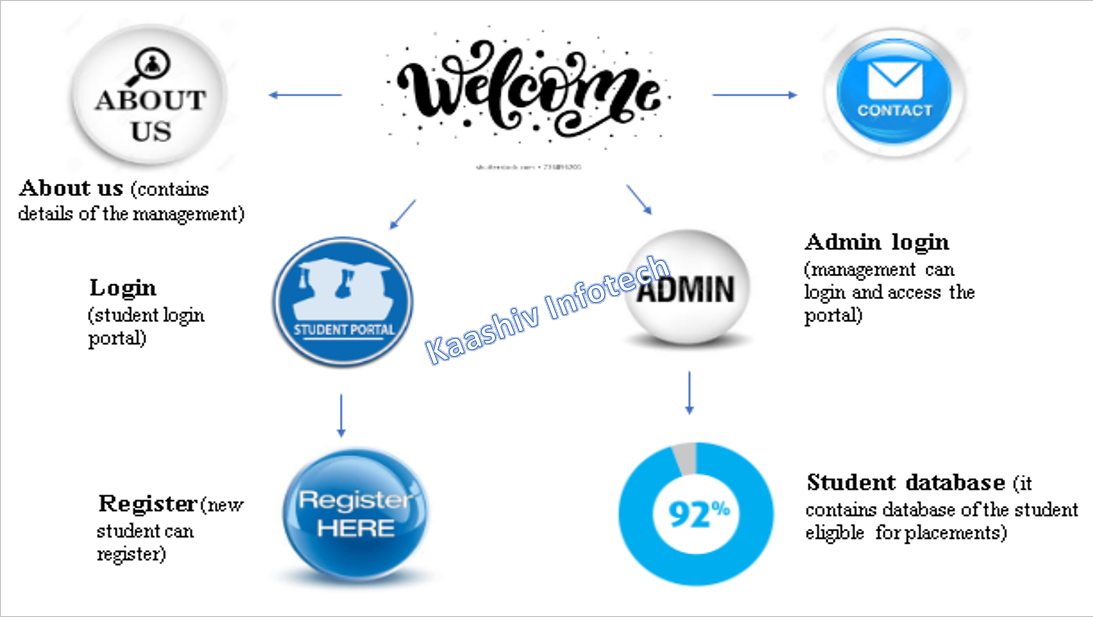
ARCHITECTURE:
SAMPLE CODE:
Welcome.cs
using System;
using System.Collections.Generic;
using System.ComponentModel;
using System.Drawing;
using System.Linq;
using System.Text;
using System.Windows.Forms;
using System.Data;

namespace CampusSelectionSystem
{
    public partial class welcome : Form
    {
        public welcome()
        {
            InitializeComponent();
        }

        private void label2_Click(object sender, EventArgs e)
        {

        }

        private void button3_Click(object sender, EventArgs e)
        {

            adminlogin al = new adminlogin();
            al.Show();
            this.Hide();
        }

        private void welcome_Load(object sender, EventArgs e)
        {

        }

        private void WELCOME1_Load(object sender, EventArgs e)
        {

        }

        private void label1_Click(object sender, EventArgs e)
        {

        }

        private void button1_Click(object sender, EventArgs e)
        {

        }

        private void button2_Click(object sender, EventArgs e)
        {

        }

        private void button2_Click_1(object sender, EventArgs e)
        {
            studentlogin sl = new studentlogin();
            sl.Show();
            this.Hide();
        }

        private void button1_Click_1(object sender, EventArgs e)
        {

          about at = new about();
            at.Show();
            this.Hide();
        }

        private void button4_Click(object sender, EventArgs e)
        {
            contact ct = new contact();
            ct.Show();
            this.Hide();

        }
    }
}


About Us.cs
using System;
using System.Collections.Generic;
using System.ComponentModel;
using System.Data;
using System.Drawing;
using System.Linq;
using System.Text;
using System.Windows.Forms;

namespace CampusSelectionSystem
{
    public partial class about : Form
    {
        public about()
        {
            InitializeComponent();
        }

        private void label2_Click(object sender, EventArgs e)
        {

        }

        private void about_Load(object sender, EventArgs e)
        {

        }

        private void label2_Click_1(object sender, EventArgs e)
        {

        }

        private void button1_Click(object sender, EventArgs e)
        {

            welcome we = new welcome();
            we.Show();
            this.Hide();
        }
    }
}


Student Login.cs
using System;
using System.Collections.Generic;
using System.ComponentModel;
using System.Data;
using System.Drawing;
using System.Linq;
using System.Text;
using System.Windows.Forms;
using System.Data.SqlClient;

namespace CampusSelectionSystem
{
    public partial class studentlogin : Form
    {
        public studentlogin()
        {
            InitializeComponent();
        }
        public static string data = "";
        public static string data1 = "";
        public static string data2 = "";
        private void studentlogin_Load(object sender, EventArgs e)
        {

        }

        private void label1_Click(object sender, EventArgs e)
        {

        }

        private void label2_Click(object sender, EventArgs e)
        {

        }

        private void label4_Click(object sender, EventArgs e)
        {

        }

        private void textBox3_TextChanged(object sender, EventArgs e)
        {

        }

        private void textBox1_TextChanged(object sender, EventArgs e)
        {


        }

        private void button2_Click(object sender, EventArgs e)
        {
                welcome we = new welcome();
            we.Show();
            this.Hide();


        }

        private void linkLabel1_LinkClicked(object sender, LinkLabelLinkClickedEventArgs e)
        {
            REGISTER re = new REGISTER();
            re.Show();
            this.Hide();

        }

        private void button1_Click(object sender, EventArgs e)
        {

           SqlConnection con = new SqlConnection(@"Data Source=DESKTOP-40D10JJ\VENKAT;Integrated Security=true;Initial Catalog=CampusSelectionSystem");
            con.Open();

                SqlCommand cmd = new SqlCommand(@"Select * from Campus Where username='" + textBox1.Text + "' and pwd='" + textBox3.Text + "' ", con);

                SqlDataReader dr = cmd.ExecuteReader();
                if (dr.HasRows)
                {
                    MessageBox.Show("Login successfully");
                    dr.Close();
                    SqlCommand cmd2 = new SqlCommand(@"Select * from Campus where username='"+textBox1.Text+"' ",con);

                SqlDataReader dr2=cmd2.ExecuteReader();
                    while (dr2.Read())
                    {
                        string a=(string) (dr2["cgpa"]);
                        data1 = (string)(dr2["fname"]);
                        data2 = (string)(dr2["lname"]);
                        if (Convert.ToDouble(a) >= 8.5)
                        {

                            method.getdata = a;
                            method.getdata1 = data1;
                            method.getdata2= data2;


                            congratulations cg = new congratulations();
                            cg.Show();
                            this.Hide();
                        }
                    }


                }
                else
                {
                    MessageBox.Show("incorrect username or password");
                }


        }
    }
}


Register.cs
using System;
using System.Collections.Generic;
using System.ComponentModel;
using System.Data;
using System.Drawing;
using System.Linq;
using System.Text;
using System.Windows.Forms;
using System.Data.SqlClient;

namespace CampusSelectionSystem
{
    public partial class REGISTER : Form
    {
        public REGISTER()
        {
            InitializeComponent();
        }
        private void button1_Click(object sender, EventArgs e)
        {
            SqlConnection con = new SqlConnection(@"Data Source=DESKTOP-40D10JJ\VENKAT;Integrated Security=true;Initial Catalog=CampusSelectionSystem");
            con.Open();


                SqlCommand cmd = new SqlCommand(@"insert into Campus values('" + textBox1.Text + "','" + textBox2.Text + "','" + textBox3.Text + "','" + textBox5.Text + "','" + textBox14.Text + "','" + textBox10.Text + "','" + textBox12.Text + "','" + textBox15.Text + "')", con);

                int x = cmd.ExecuteNonQuery();
                if (x > 0)
                {
                    MessageBox.Show("data inserted successfully");

                }
                else
                {
                    MessageBox.Show("data Not inserted succcessfully");
                }


        }
        private void button2_Click(object sender, EventArgs e)
        {
            studentlogin sl = new studentlogin();
            sl.Show();
            this.Hide();


        }
    }
}


Admin Login.cs
using System;
using System.Collections.Generic;
using System.ComponentModel;
using System.Data;
using System.Drawing;
using System.Linq;
using System.Text;
using System.Windows.Forms;

namespace CampusSelectionSystem
{
    public partial class adminlogin : Form
    {
        public adminlogin()
        {
            InitializeComponent();
        }

        private void adminlogin_Load(object sender, EventArgs e)
        {

        }

        private void label1_Click(object sender, EventArgs e)
        {

        }

        private void textBox1_TextChanged(object sender, EventArgs e)
        {

        }

        private void label2_Click(object sender, EventArgs e)
        {

        }

        private void button2_Click(object sender, EventArgs e){
            welcome we = new welcome();
            we.Show();
            this.Hide();


        }

        private void button1_Click(object sender, EventArgs e)
        {
            String a = textBox1.Text;
            String b = textBox2.Text;
            if ((a == "admin") && (b == "admin"))
            {
                MessageBox.Show("success");
                studentdata sd = new studentdata();
                sd.Show();
                this.Hide();
            }
            else
            {
                MessageBox.Show("failed");
            }
        }
    }
}


Student Data.cs
using System;
using System.Collections.Generic;
using System.ComponentModel;
using System.Data;
using System.Drawing;
using System.Linq;
using System.Text;
using System.Windows.Forms;
using System.Data.SqlClient;

namespace CampusSelectionSystem
{
    public partial class studentdata : Form
    {
        public studentdata()
        {
            InitializeComponent();
        }

        private void label1_Click(object sender, EventArgs e)
        {

        }

        private void label3_Click(object sender, EventArgs e)
        {

        }

        private void button1_Click(object sender, EventArgs e)
        {

        }

        private void studentdata_Load(object sender, EventArgs e)
        {
            SqlConnection con = new SqlConnection(@"Data Source=DESKTOP-40D10JJ\VENKAT;Integrated Security=true;Initial Catalog=CampusSelectionSystem");
            con.Open();
            SqlCommand cmd = new SqlCommand("select * from Campus", con);
            SqlDataAdapter da = new SqlDataAdapter(cmd);
            DataSet ds = new DataSet();
            da.Fill(ds);
            dataGridView1.DataSource = ds.Tables[0];
            con.Close();
        }

        private void textBox1_TextChanged(object sender, EventArgs e)
        {

        }

        private void textBox2_TextChanged(object sender, EventArgs e)
        {

        }

        private void label2_Click(object sender, EventArgs e)
        {

        }

        private void button1_Click_1(object sender, EventArgs e)
        {
           adminlogin al = new adminlogin();
            al.Show();
            this.Hide();
        }

        private void dataGridView1_CellContentClick(object sender, DataGridViewCellEventArgs e)
        {


        }
    }
}


Contact Us.cs
using System;
using System.Collections.Generic;
using System.ComponentModel;
using System.Data;
using System.Drawing;
using System.Linq;
using System.Text;
using System.Windows.Forms;

namespace CampusSelectionSystem
{
    public partial class contact : Form
    {
        public contact()
        {
            InitializeComponent();
        }

        private void label1_Click(object sender, EventArgs e)
        {

        }

        private void label2_Click(object sender, EventArgs e)
        {

        }

        private void label4_Click(object sender, EventArgs e)
        {

        }

        private void label5_Click(object sender, EventArgs e)
        {

        }

        private void label7_Click(object sender, EventArgs e)
        {

        }

        private void button1_Click(object sender, EventArgs e)
        {
            welcome we = new welcome();
            we.Show();
            this.Hide();

        }
    }
}
MODULES SPECIFICATION:
A module is a part of a program. Programs are composed of one or more independently developed modules that are not combined until the program is linked. A single module can contain one or several routines. The project contains the following main modules.
• WELCOME MODULE
• ABOUT US MODULE
• STUDENT LOGIN MODULE
• REGISTER MODULE
• ADMIN LOGIN MODULE
• STUDENT DATA MODULE
• CONTACT US MODULE
WELCOME MODULE:
In Welcome Module, the user can select which module he/ she to be used. The user can choose about us or student login or admin login or contact us or student data base.
ABOUT US MODULE:
In this module, the user can view the details of the management. This module has access only to the management but the user can view the page.
STUDNT LOGIN MODULE:
In this module, the student can login the management portal and view the details. This module consists of following fields:
• Username: Name of the student
• Password: Password for the user to login
REGISTER MODULE:
In this module, the new student can register for placement recruitment. This module contains following fields:
• First Name : First Name of the student
• Last Name : Last Name of the student
• Mobile No : Mobile number of the student
• Gender : Gender of the student
• Email : Email id of the student
• City : City of the student
• Address : Address of the student
• DOB : Date of birth of the student
• Age : Age of the student
• 12th mark : Mark of the student
• University Name : Name of the university
• CGPA : Grade of the student
• Year of passing : Passing year of the student
• Username : Name of the student
• Password : Password for the user
ADMIN LOGIN MODULE:
In this module, the management can login to access the web page. This module contains the following fields:
• Username: Name of the management
• Password: Password for the user
STUDENT DATA MODULE:
In this module, the admin updates the student database for the recruitment process which is used to shortlist for the company.
CONTACT US MODULE:
In this module, the user can view the contact details of the management. This module has access only to management.
ISO CERTIFIED - MINI PROJECTS FOR MTECH:
KaaShiv Offers, Mini projects for mtech. Mini project for mtech includes Block Chain, Artificial Intelligence, Machine Learning, Python and R programming, Application Development, Web designing and Networking . This internship includes the topics related to mini projects for mtech 2nd year, mini projects for mtech 3rd year with circuit diagram.This company runs by,
• 10 Years Awarded Microsoft Most Valuable Professional
• Google Recognized Experts
• Cisco Recognized Certified Experts
• Microsoft Awarded Certified Experts
• Robotics Experts
• HCL Technologies Awarded Expert
Trainers at KaaShiv InfoTech are real-time Software / IT professionals worked in leading MNCs like,
• CTS,
• Wipro,
• TCS,
• Infosys,
• Accenture and
• Mindtree.
The Course curriculum for mini projects for mtech is carefully researched and prepared by professionals from MNC to meet the demands expected in the IT industry. After completing the mini project Training in Chennai at KaaShiv Infotech, students will be familiar with the Software development process followed in IT industry. Below are some of the insights of our mini projects program for mtech.
• Real-time project development and Technology Training by Microsoft Awarded Most Valuable Professiona
• mini projects for bca students involves Full practical training
• Hardware and software tools full support
• Technology training
• Placement training
• Full documentation and report analysis
• R & D projects
• Industrial exposure
• Endorsing Corporate skills
WHAT IS MINI PROJECT ?
• The mini Projects plays a crucial role in the teaching-learning process.
• It is also a way of identifying the ability of the student to perform an industrial project or applied research linked to the knowledge discipline.
• A project is defined as an effort to create or modify a specific product or service.
• Projects are temporary work efforts with a clear beginning and end.
• mini project (or program) any undertaking, carried out individually or collaboratively and possibly involving research or design, that is carefully planned (usually by a project team) to achieve a particular aim.
WHAT ARE THE BENEFITS GAINED BY DOING MINI PROJECT :
• mini projects if done well can add a lot of credibility to your profile.
• And especially your mini projects building experience can help you perform well in core job placements & higher studies admission interviews.
TIPS TO SELECT GOOD MINI PROJECTS:
• Analyze the current trends
• Focus your mini projects on any social issue
• Get expert’s assistance whenever possible
• Research about the mini projects done by your seniors
• Refer the research journals published by scholars
• Check the feasibility of your mini projects
• Work with organizations like Kaashiv InfoTech
WHY, MTECH STUDENTS MINI PROJECTS SHOULD BE A REAL TIME MINI PROJECTS ?
• mini projects for mtech students provides a real time exposure for the mini projects for mtech students on the latest and trending technologies. Below are some of the Top jobs in the IT Industry Job Openings ,
• Software Developers – Good in Python, Machine Learning, Data Science and AI programming
• BlockChain Administrators
• IOT Specialists
• Cyber Security
• Web Application Developer – Web Designers
• Information Security Analyst – Security Specialist
• Network Engineers / Analyst
KaaShiv Infotech, mtech Student mini projects - programme hornes you in the above said skills / job roles from basics to Advanced.
MINI PROJECTS FOR MTECH - PROGRAMME HIGHLIGHTS :
• mini projects for mtech program duration: 5days/ 10days / Or Any number of days
• Training hours: 3hrs per day
• Software & others tools installation Guidance
• Hardware support
• mini projects for mtech Report creation / Project Report creation
• mini projects for mtech students based 2 projects ( real time)
• Mini project Certificate & Inplant Training Certificate & Industrial exposure certificate + (Achievement certificate for best performers)
ADVANTAGES OF OUR- MINI PROJECTS FOR MTECH :
• Get Real Work Experience
• Get a Taste of Your Chosen Field
• Start Networking
• Helps You Choose a Speciality
• Helps You Become More Self-Confident
• Boosts Your CV
• Increases Your Market Value
MINI PROJECTS FOR MTECH - MATERIALS :
• mini project for mtech student , includes Materials after the internship programme
• Technological guidance and materials will be shared in entire year for the students to mold technically.
• Our be student involves Free Projects at the end of the programme.
QUERIES OR CONTACT DETAILS :
Venkat (7667662428) and Asha (7667668009)
Email ID: kaashiv.info@gmail.com , priyanka.kaashiv@gmail.com
MINI PROJECTS FOR MTECH- PROGRAMME DURATION :
1 month / 2 months / 3 months to 6 Months ( Any Number of Days - Based on student preferences)
WHO CAN ATTEND THIS MINI PROJECTS FOR MTECH PROGRAMME :
Mini projects for mtech - Programme can be attended by the students who are looking for mini projects for mtech/ mini projects for mtech 2nd year
MINI PROJECTS FOR MTECH- PROGRAMME OUTCOME :
1. Student will be specialized in Block Chain, Artificial Intelligence, Machine Learning, Python and R programming, Application Development
, Web designing and Networking concepts (Basics to Advanced)
2. Covering 45 concepts
3. Students will be getting trained in / writing 45 Programs – Will change based on the durations of the program.
4. 2 Projects and project documents will be given at the end of the program
REFERENCE YOUTUBE URL FOR MINI PROJECTS FOR MTECH :
Check our Internship Training sample videos at this URL –
www.youtube.com/channel
REGISTRATION LINK FOR – MINI PROJECTS FOR MTECH :
mini projects for bca - Offline - Office training
Fill our online Internship form
MINI PROJECTS FOR MTECH – DEMO LINK :
Check out our Sample mini project for MTECH Content for the training
kaashivinfotech.com/inplant-training-in-chennai-for-cse-demo
CHECK OUR PREVIOUS TESTIMONIALS FROM STUDENTS FROM DIFFERENT COUNTRIES AND DIFFERENT STATES :
www.kaashivinfotech.com/testimonials/
CHECK OUR STUDENTS FEEDBACK ON OUR - MINI PROJECTS FOR MTECH:
mini projects for mtech- Feedback - inplant-training-feedback /
mini projects for mtech - Feedback - internship-feedback
CHECK OUT THE COLLEGES ATTENDED OUR MINI PROJECT FOR MTECH:
internship-and-inplant-training-attendees/
CHECK OUR SOCIAL SERVICE YOUTUBE CHANNELS:
www.youtube.com/channel
Check our Social Service youtube channels
REAL TIME PROJECT:
We ranked Top 200 technological companies in Tamil Nadu, Click here to view
MORE ON OUR, MINI PROJECTS FOR MTECH :
In our, internship on mini projects for mtech- programme below are following different kind of programmes focused such as,
1. Mini projects for mtech (or) paid Mini projects for mtech,
- Kaashiv Provides an in-depth knowledge of software Platform and other relevant software technologies.
2. Mini projects for mtech work from home – Our company provides facility for the students to learn from home as an mini projets for mtech based on latest technological trends.
3. Mini projects for mtech report – Reports are also provided for the Mini projects for mtech students in our company related
4. Mini projects for mtech jobs – 100% Job assistance will be provided for the students to gain practical knowledge during the Mini projects for mtech period in our company.
5. Mini projects for mtech summer / Winter internship 2019/2020 – Summer / Winter holiday internship in mini projects will be given to the student based on the developer knowledge base.
6. Mini projects for mtech interview questions – We provide top trending and frequently asked question for the intern students during the internship period based on software development and trending technologies.
7. Mini projects for mtech test – Based on the students request, if you are looking for any test to validate your knowledge. we are ready to provide the same.
8. Mini projects for mtech certificate – Industry recognized certificates will be provided for the students who perform internship in our company based .
9. Mini projects for mtech online– Learn Mini projects for mtech from home, our company perform internship through online too.
10. Mini projects for mtech ppt / projects report – We provide Mini projects for mtech based ppts. projects and project reports as materials after the internship in our company.
11. Free Mini project for mtech - Our company will provide Mini projects for mtech the best students of kaashiv infotech.
12. Project For Diploma mini projects for mtech – We offer project for the diploma mini project for mtech students in our company.
13. Mini project for mtech 2nd Year – Our company offers you mini projects for mtech the above students.